Thursday, 8 March 2012

Locks and Duration of Transactions in MS SQL Server


It is a common argument which I hear among developers these days, regarding SQL locks. Some say that the ‘locks are held for the duration of the entire transaction’. But others debate that ‘locks will be only held for the duration of the statement execution’. But who is correct ?

Well both parties are correct up to a certain point. Actually lock durations are depend on the Isolation Levels.

As mentioned in the SQL-99 Standards, there are 4 Transaction Isolation Levels

  • Read Committed (Default)
  • Read Uncommitted
  • Repeatable Read
  • Serializable

SQL Server** provides following two additional isolation levels (** SQL Server 2005 & Upwards)

  • Snapshot
  • Read Committed Snapshot

There are several concurrency issues which can occur in a DBMS when multiple users try to access the same data. Each isolation level protects against a specific concurrency problem.

  • Lost Update
  • Dirty Read
  • Non-Repeatable Read
  • Phantom Reads


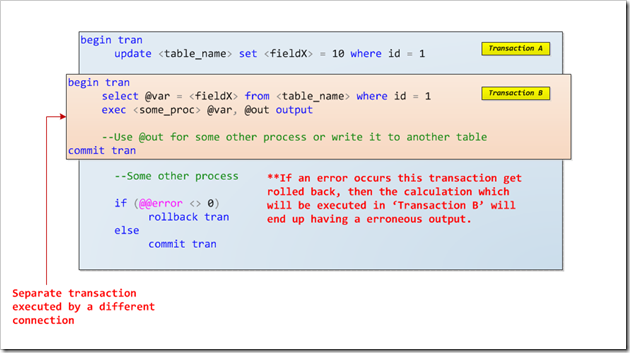
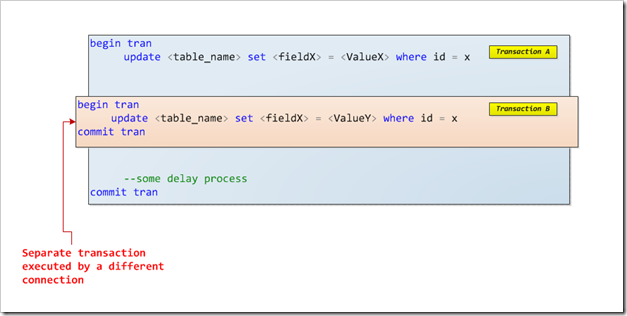
Lost Update – This can take place in two ways. First scenario: it can take place when data that has been updated by one transaction (Transaction A), overwritten by another transaction (Transaction B), before the Transaction A commits or rolls back. (But this type of lost update can never occur in SQL Server** under any transaction isolation level)

img_screen_02

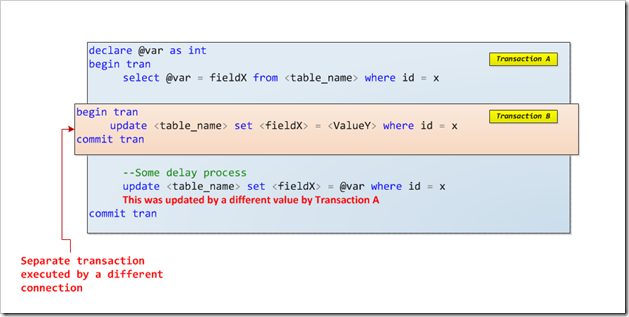
The second scenario is when one transaction (Transaction A) reads a record and retrieve the value into a local variable and that same record will be updated by another transaction (Transaction B). And later Transaction A will update the record using the value in the local variable. In this scenario the update done by Transaction B can be considered as a ‘Lost Update’.

img_screen_04


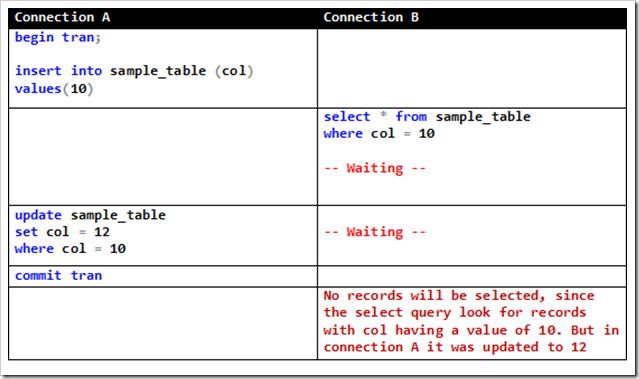
Dirty Read – This is when the data which is changed by one transaction (Uncommitted) is accessed by a different transaction. All isolation levels except for the ‘Read Uncommitted’ are protected against ‘Dirty Reads’.

img_screen_05


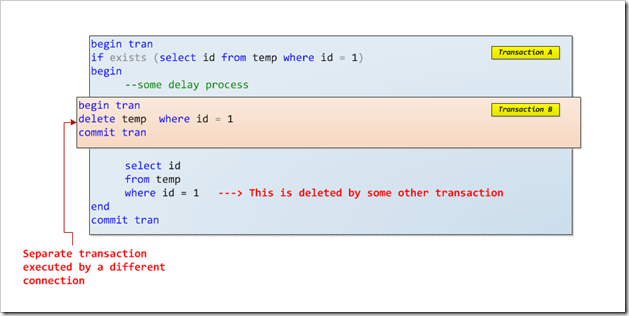
Non Repeatable Read – This is when a specific set of data which is accessed more than once in one transaction (Transaction A) and between these accesses, it’s being updated or deleted by another transaction (Transaction B). The repeatable read, serializable, and snapshot isolation levels protect a transaction from non-repeatable reads.

img_screen_03


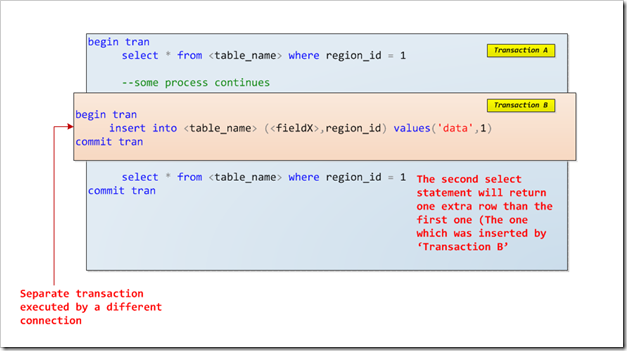
Phantom Read – This is when two queries in the same transaction, against the same table, use the same ‘WHERE’ clause, and the query executed last returns more rows than the first one. Only the serializable and snapshot isolation levels protect a transaction from phantom reads.

img_screen_06


In order to solve the above mentioned concurrency issues, SQL Server uses the following type of locks.

  • Shared or S-locks - Shared locks are sometimes referred to as read locks. There can be several shared locks on any resource (such as a row or a page) at any one time. Shared locks are compatible with other shared locks.
  • Exclusive or X-locks - Exclusive locks are also referred to as write locks. Only one exclusive lock can exist on a resource at any time. Exclusive locks are not compatible with other locks, including shared locks.
  • Update or U-locks - Update locks can be viewed as a combination of shared and exclusive locks. An update lock is used to lock rows when they are selected for update, before they are actually updated. Update locks are compatible with shared locks, but not with other update locks.

Please refer to the following link to get more information regarding lock types. http://msdn.microsoft.com/en-us/library/ms175519.aspx

As I have mentioned earlier, the type of lock which the SQL server will be acquired depends on the active transactions isolation level. I will briefly describe each isolation level a bit further.

Read Committed Isolation Level – This is the default isolation level for new connections in SQL Server. This makes sure that dirty reads do not occur in your transactions. If the connection uses this isolation level, and if it encounters a dirty row while executing a DML statement, it’ll wait until the transaction which owns that row has been committed or rolled back, before continuing execution further ahead.

img_screen_07


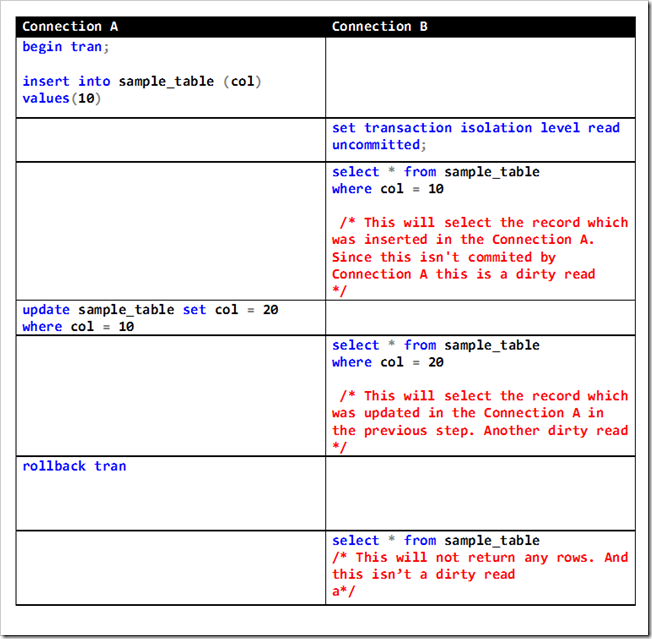
Read Uncommitted Isolation level - Though this is not highly recommended by experts, it's better to consider about it too. It may result in a 'dirty read', but when correctly used it could provide great performance benefits.

You should consider using this isolation level only in routines where the issue of dirty reads is not a problem. Such routines usually return information that is not directly used as a basis for decisions. A typical example where dirty reads might be allowed is for queries that return data that are only used in lists in the application (such as a list of customers) or if the database is only used for read operations.

The read uncommitted isolation level is by far the best isolation level to use for performance, as it does not wait for other connections to complete their transactions when it wants to read data that these transactions have modified. In the read uncommitted isolation level, shared locks are not acquired for read operations; this is what makes dirty reads possible. This fact also reduces the work and memory required by the SQL Server lock manager. Because shared locks are not acquired, it is no problem to read resources locked by exclusive locks. However, while a query is executing in the read uncommitted isolation level, another type of lock called a ‘schema stability lock’ (Sch-S) is acquired to prevent Data Definition Language (DDL) statements from changing the table structure. Below is an example of the behavior of this isolation level.

img_screen_08


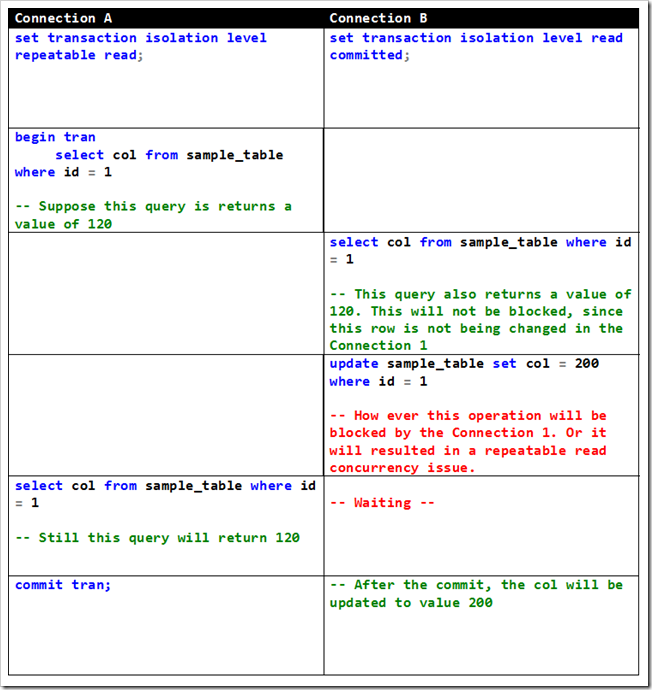
Repeatable Read Isolation Level - In this isolation level, it guarantees that dirty reads do not happen in your transaction. Also it makes sure that if you execute/issue two DML statements against the same table with the same where clause, both queries will return the same results. But this isolation level will protect against updates and deletes of earlier accessed rows, but not the inserts, which is known as ‘Phantom’ rows concurrency problem. Note that phantom rows might also occur if you use aggregate functions, although it is not as easy to detect.

img_screen_09


Serializable Isolation Level – This guarantees that none of the aforesaid concurrency issues can occur. It is very much similar to the ‘repeatable read isolation level’ except that this prevents the ‘phantom read’ also. But use of this isolation level increases the risk of having more blocked transactions and deadlocks compared to ‘Repeat Read’. However it will guarantee that if you issue two DML statements against the same table with the same WHERE clause, both of them will return exactly the same results, including same number of row count. To protect the transaction from inserts, SQL Server will need to lock a range of an index over a column that is included in the WHERE clause with shared locks. If such an index does not exist, SQL Server will need to lock the entire table.


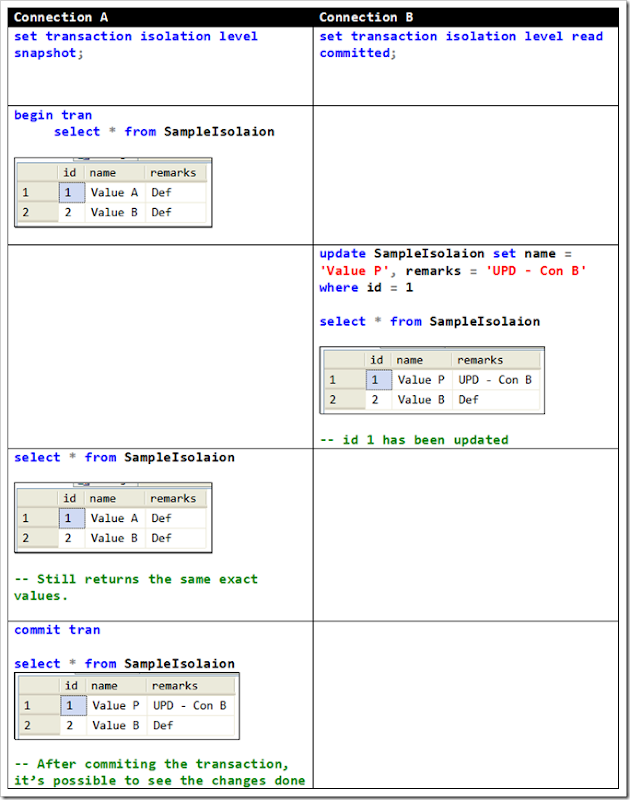
Snapshot Isolation Level – In addition to the SQL’s standard isolation levels, SQL 2005 introduced ‘Snapshot Isolation Level’. This will protect against all the above mentioned concurrency issues, like the ‘Serializable Isolation Level’. But the main difference of this is, that it does not achieve this by preventing access to rows by other transaction. Only by storing versions of rows while the transaction is active as well as tracking when a specific row was inserted.

To illustrate this I will be using a test database. It’s name is ‘SampleDB’. First you have to enable the ‘Snapshot Isolation Level’ prior using it

alter database SampleDB set allow_snapshot_isolation on;
alter database SampleDB set read_committed_snapshot off;


Now we’ll create a sample table and insert few records.


create table SampleIsolaion(
id int,
name varchar(20),
remarks varchar(20) default ''
)

insert into SampleIsolaion (id,name,remarks)
select 1, 'Value A', 'Def' union
select 2, 'Value B', 'Def'


img_screen_10


Read Committed Snapshot Isolation Level – This can be considered as a new implementation of the ‘Read Committed’ isolation level. When this option is set, this provides statement level read consistency and we will see this using some examples in the post. Using this option, the reads do not take any page or row locks (only SCH-s: Schema Stability locks) and read the version of the data using row versioning by reading the data from tempdb. This option is set at the database level using the ALTER DATABASE command


I will illustrate the use of this isolation level with a sample. First enable the required isolation level.


alter database SampleDB set read_committed_snapshot on;
alter database SampleDB set allow_snapshot_isolation on;


Now lets create a table and populate it with few sample data.


create table sample_table(
id int,
descr varchar(20),
remarks varchar(20)
)

insert into sample_table
select 1,'Val A','Def' union
select 2,'Val B','Def'


Now open two query windows in SQL Server Management Studio.


--Window 1
begin tran
update sample_table set descr = 'Val P', remarks = 'Window 1' where id = 1


Without committing execute the following in the second window


--Window 2
begin tran
set transaction isolation level read committed
select * from sample_table


And you can see, even without committing, it’ll read from the older values, from the row versions which were created in the tempdb. If it was only the ‘Read Commited’ isolation level without the ‘Read Committed Snapshot’ option turned on, this select statement would have been locked.

Monday, 16 January 2012

Exclusive access could not be obtained because the database is in use ~ Resolved


img_screen_001

Sometimes this is a common error message that we encounter, when we try to restore a SQL database, which is being used by other users.

This can occur due to various reasons. But the most common incident is, users not closing the Management Studio’s query window after they have finished the query task.

There are few ways of resolving this and restore the database.

1.    Find all the active connections, kill them all and restore the database
2.    Get database to offline (And this will close all the opened connections to this database), bring it back to online and restore the database

Method 1

Use the following script to find and kill all the opened connections to the database before restoring database.

declare @sql as varchar(20), @spid as int

select @spid = min(spid) from master..sysprocesses where dbid = db_id('<database_name>')
and spid != @@spid

while (@spid is not null)
begin
print 'Killing process ' + cast(@spid as varchar) + ' ...'
set @sql = 'kill ' + cast(@spid as varchar)
exec (@sql)

select
@spid = min(spid)
from
master..sysprocesses
where
dbid = db_id('<database_name>')
and spid != @@spid
end

print 'Process completed...'


Method 2


Use the following code to take database offline and bring back to online so that all the active connections will be closed. And afterwards restore the database.


alter database database_name
set offline with rollback immediate
alter database database_name
set online
go

Friday, 25 November 2011

Deploy/Use assemblies which require Unsafe/External Access with CLR and T-SQL


What is an Unsafe Assembly?

Assemblies which are built using normal computational functions are considered as safe assemblies. But when assemblies do external operations such as reading file information, creating files, etc.… they are categorized as unsafe/external assemblies.

**Visual studio creates safe assemblies by default.

We will create an assembly which access the external file system, so that it will need external access. We will create a simple function which will return the file size for a given file, using the ‘FileInfo’ class.

using System;
using Microsoft.SqlServer.Server;
using System.IO;

public partial class UserDefinedFunctions {
[SqlFunction]
public static long GetFileSize(string FileName) {
FileInfo fi = new FileInfo(FileName);
return fi.Length;
}

};


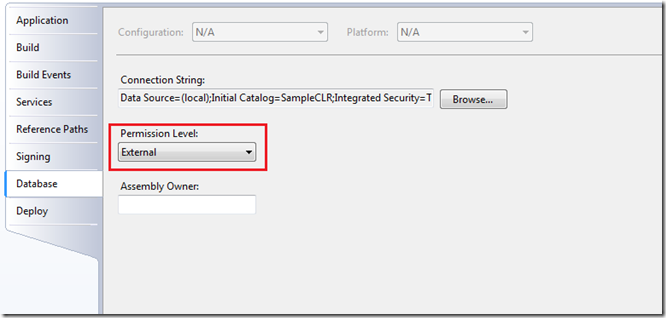
Now right click the project (from the solution explorer) and go the properties tab. Form the ‘Database’ tab select the permission level to ‘External’. (Default value is ‘Safe’)

img_scr_001

Open MS SQL Server Management Studio (Run it as Administrator since you are going to assign permission to the current user), and log in as a different user than the one you are trying to provide access permission (For this example I am logging as ‘sa’). Execute the following script.


use master;
grant external access assembly to [Domain\UserID];
use SampleCLR;


Use the appropriate values for ‘Domain’ and ‘UserID’. (And ‘SampleCLR’ is the database that I will be using)

**Please note that this is a server wide permission. Therefore user can create any external assembly in any database on the SQL Server.

Above script will grant permission the user to create external assemblies on the executed server. But it is not sufficient. The database should be allowed to have external access assemblies.

There are two methods of doing so.


  1. Making the database trusted.
  2. Using sign assemblies.

Method 1 ~ Making Database Trusted

Execute the following script (using Management Studio) in order to make the database trusted.

alter database SampleCLR set trustworthy on;


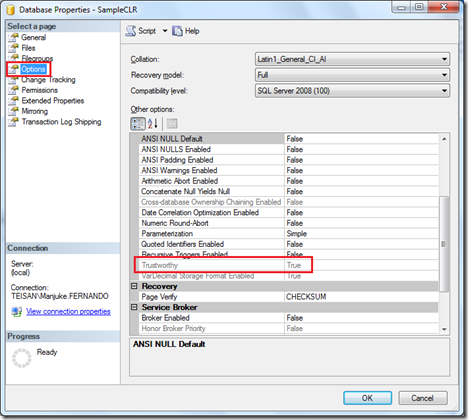
And if you inspect the database properties, you can see that the database’s ‘Trustworthy’ property value is changed to ‘True’

img_scr_002

Now go to visual studio and deploy the solution. It will succeed without any issues.

However if you try to deploy without doing the above mentioned steps, you will get the following error.


CREATE ASSEMBLY for assembly <AssemblyName> failed because assembly <AssemblyName> is not authorized for PERMISSION_SET = EXTERNAL_ACCESS. The assembly is authorized when either of the following is true: the database owner (DBO) has EXTERNAL ACCESS ASSEMBLY permission and the database has the TRUSTWORTHY database property on; or the assembly is signed with a certificate or an asymmetric key that has a corresponding login with EXTERNAL ACCESS ASSEMBLY permission


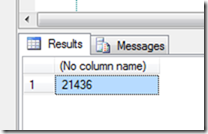
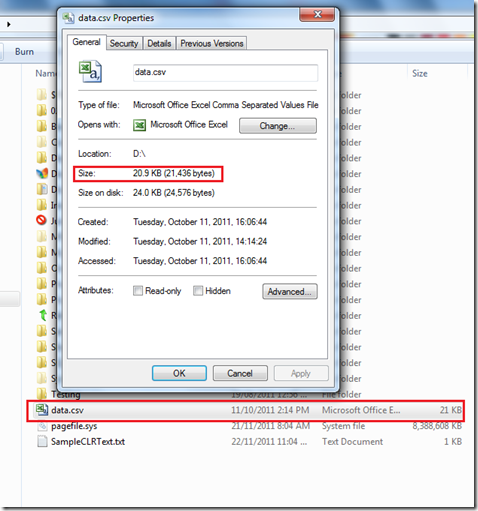
We will check the deployed assembly by executing the following script. (I have a file on my D:\ drive with the mentioned name.)


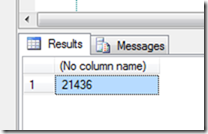
select dbo.GetFileSize(N'D:\data.csv')

img_scr_003


img_scr_004


And if you try to execute the function without making the database trusted you will get the following error


Msg 10314, Level 16, State 11, Line 1
An error occurred in the Microsoft .NET Framework while trying to load assembly id 65540. The server may be running out of resources, or the assembly may not be trusted with PERMISSION_SET = EXTERNAL_ACCESS or UNSAFE. Run the query again, or check documentation to see how to solve the assembly trust issues. For more information about this error:
System.IO.FileLoadException: Could not load file or assembly 'sqlclrproject, Version=0.0.0.0, Culture=neutral, PublicKeyToken=null' or one of its dependencies. An error relating to security occurred. (Exception from HRESULT: 0x8013150A)
System.IO.FileLoadException:
   at System.Reflection.Assembly._nLoad(AssemblyName fileName, String codeBase, Evidence assemblySecurity, Assembly locationHint, StackCrawlMark& stackMark, Boolean throwOnFileNotFound, Boolean forIntrospection)
   at System.Reflection.Assembly.InternalLoad(AssemblyName assemblyRef, Evidence assemblySecurity, StackCrawlMark& stackMark, Boolean forIntrospection)
   at System.Reflection.Assembly.InternalLoad(String assemblyString, Evidence assemblySecurity, StackCrawlMark& stackMark, Boolean forIntrospection)
   at System.Reflection.Assembly.Load(String assemblyString)


Method 2 ~ Using Sign Assemblies

Set the trustworthy to false by using the following script (You only have to do this if you have made the database a trusted one in the previous example, and I am keeping it false for illustrated purpose)


alter database SampleCLR set trustworthy off;


In order to sign an assembly we need a public/private key file (.snk file). We will create one using the ‘sn.exe’.

img_scr_005


sn -k "D:\Sample CLR\SampleCLRKey.snk"


And sign the assembly using the key file that we have created now.

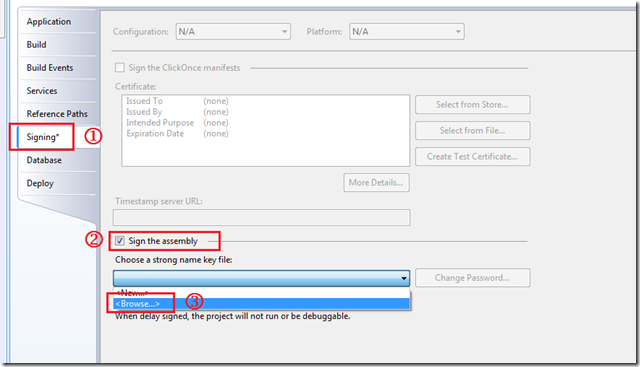
To sign an assembly: go to project properties => select the ‘Signing’ tab and check the ‘Sign the assembly’ check box and browse and select the created file. Save the project.

In order to deploy the assembly,


  1. Need to create an asymmetric key using the key file which we have created in the SQL Server
  2. Need to create a login using that asymmetric key
  3. Giving that login the permission for external access assemblies

img_scr_006


Use the following script to create the asymmetric key using SQL Server Management Studio. (** Please note that the key should be created on the master database)


use master;
create asymmetric key CLRExtensionKey
from file = 'D:\Sample CLR\SampleCLRKey.snk'
encryption by password = '@Str0ngP@$$w0rd'


Now create the login using the above created key (*Please note that the login should be created on the database which you want to publish the assembly to)


use SampleCLR;
create login CLRExtensionLogin from asymmetric key CLRExtensionKey;


Give the login permission for external access assemblies.


use master;
grant external access assembly to CLRExtensionLogin;


Now go to visual studio and deploy the solution. And you can use the following statement which we used in Method 1.


select dbo.GetFileSize(N'D:\data.csv')


img_scr_007

Tuesday, 22 November 2011

Using CLR functions with T-SQL


Why use CLR?
Before using CLR, you should question ‘Why’. When using CLR functions within T-SQL, you have to maintain two different programming environments, unless what you gain worth more than having it.
We need to use the CLR functions when occasions such as:
When we have to access system resources like file system or network (**Extended stored procedures can do the same. But they are deprecated and will be removed from future versions of SQL)
Or when the business logics are too complex to write in T-SQL, which can be easily done using .net languages (Reusing the logics already written, without duplicating them using T-SQL)

To illustrate this I will create a CLR function which will create a text file and append the text which is passed from a T-SQL statement.
Open Visual studio and create a new ‘SQL Server Project’
img_scr_001

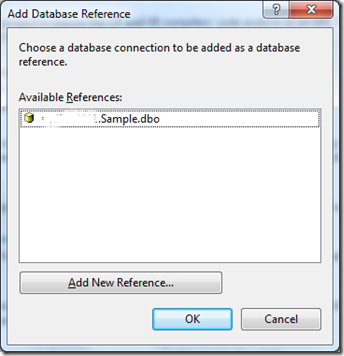
Next dialog you will be prompted to select the database which you plan to deploy your extension. You can either select from existing or connect to a different one.
img_scr_002

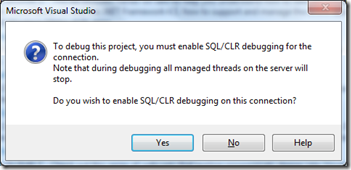
In next screen you will be prompted, whether you want to debug your .net coding. Select ‘yes’ or ‘no’ depending on your requirement.
img_scr_003

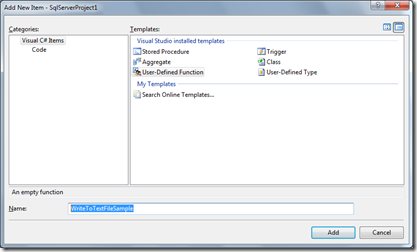
Right click on the newly created project and add new user-defined- function
img_scr_004
I have named it as ‘WriteToTextFileSample’.
img_scr_005
Use the following code:
using System;
using System.Data;
using System.Data.SqlClient;
using System.Data.SqlTypes;
using Microsoft.SqlServer.Server;

using System.IO;
using System.Text;

public partial class UserDefinedFunctions {
[Microsoft.SqlServer.Server.SqlFunction]
public static SqlString WriteToTextFileSample(string filename, string data) {
FileStream fs = File.Open(filename, FileMode.Append);
byte[] b = new UTF8Encoding(true).GetBytes(data);

fs.Write(b, 0, data.Length);
fs.Close();

return new SqlString("Completed");
}
};

**The functions should be 'public static' and all the functions should have '[Microsoft.SqlServer.Server.SqlFunction]' attribute or you will not be able to call it from SQL.


Go to the project properties and change the ‘Permission Level’ to ‘Unsafe’ in Database section. (This is only required if you are performing tasks such as writing to files, accessing system related resources. You do not need this if you are performing calculations, etc..)

Save your project. Before deploying this you have to enable the ‘clr  enable’ to ‘1’. Use the following T-SQL statement to do so.

sp_configure 'show advanced options', 1;
GO
RECONFIGURE;
GO
sp_configure 'clr enabled', 1;
GO
RECONFIGURE;
GO


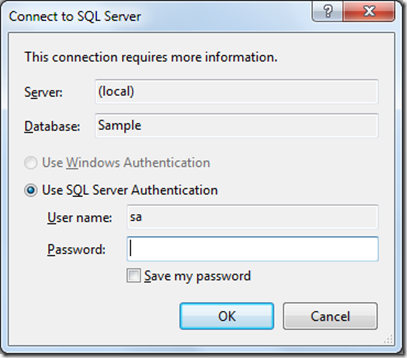
Once executed, deploy the project (Build—> Deploy Solution). You will be prompted with the SQL credentials.

img_scr_006


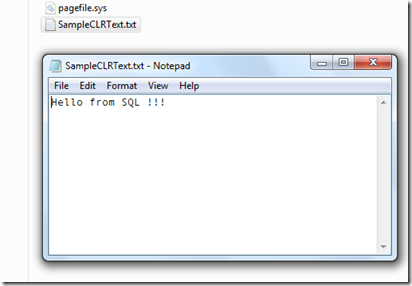
Once it’s deployed successfully use the following sample statement to use the function which we have created.

select dbo.WriteToTextFileSample(
N'D:\SampleCLRText.txt',
N'Hello from SQL !!!'
)


img_scr_007

Tuesday, 9 August 2011

Change the data source of a Crystal Report at Run-time using C#

It’s a known fact, that in Crystal Reports, if you try to display details, using data in a SQL Server Database other than the one that you’ve used to design the report, either you have to set the database location (or refresh the report). This is a common issue that development team face when the reports are being deployed to the production environment.

But this can be prevented using the following method.

Following namespaces are required.

using CrystalDecisions.CrystalReports.Engine;

using CrystalDecisions.Shared;


And we have to assign the required SQL server information to each table/view of the report, sub reports and the report viewer.

Use the following code:


SQLReport report = new SQLReport();

//Get SQL Server Details
string zServer = @"SERVER_NAME";
string zDatabase = @"DATABASE";
string zUsername = @"USER";
string zPassword = @"PASSWORD";

ConnectionInfo ciReportConnection = new ConnectionInfo();

ciReportConnection.ServerName = zServer;
ciReportConnection.DatabaseName = zDatabase;
ciReportConnection.UserID = zUsername;
ciReportConnection.Password = zPassword;

//Assign data source details to tables

foreach (Table table in report.Database.Tables) {
table.LogOnInfo.ConnectionInfo = ciReportConnection;
table.ApplyLogOnInfo(table.LogOnInfo);
}

foreach (ReportDocument subrep in report.Subreports) {
foreach (Table table in subrep.Database.Tables) {
table.LogOnInfo.ConnectionInfo = ciReportConnection;
table.ApplyLogOnInfo(table.LogOnInfo);
}
}

//Assign data source details to the report viewer
if (this.crystalReportViewer1.LogOnInfo != null) {
TableLogOnInfos tlInfo = this.crystalReportViewer1.LogOnInfo;
foreach (TableLogOnInfo tbloginfo in tlInfo) {
tbloginfo.ConnectionInfo = ciReportConnection;
}
}


crystalReportViewer1.ReportSource = report;
crystalReportViewer1.Refresh();

Monday, 8 August 2011

Invoke a custom method when Crystal Report Viewers’ print button is clicked / Add custom button to Crystal Report Viewer Toolbar

If you are developing applications which includes reporting with Crystal Reports, you may have noticed that it’s not possible to invoke a custom method, when the user prints the report. However this was something which was easily implemented in Crystal Reports 8/8.5 but removed from latter versions.

But there’s a workaround for this. In this example I will show you how to invoke a method in our client application, when the print button of the report viewer is clicked.
In order to do that we have to add our custom method to the report viewers’ print buttons’ print action.

Create a new windows application.

Add another form to the project and name it as ‘CustomReportViewer.cs’.

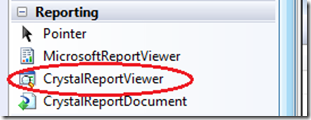
Add a Crystal Report viewer to a newly created form. (If the crystal report viewer is not available in the toolbox, please add it to the toolbox first)

img_scr_001_a

img_scr_002

Add new report to the project and name it as ‘SampleReport.rpt’.

img_scr_003

Now add the following code to the ‘CustomReportViewer’ class

public delegate void CustomPrintDelegate();


Add the following property.


public Delegate CustomPrintMethod { get; set; }


Add this additional code to the initialization method.


foreach (Control control in crystalReportViewer1.Controls) {
if (control is System.Windows.Forms.ToolStrip) {

//Default Print Button
ToolStripItem tsItem = ((ToolStrip)control).Items[1];
tsItem.Click += new EventHandler(tsItem_Click);

//Custom Button
ToolStripItem tsNewItem = ((ToolStrip)control).Items.Add("");
tsNewItem.ToolTipText = "Custom Print Button";
tsNewItem.Image = Resources.CustomButton;
tsNewItem.Tag = "99";
((ToolStrip)control).Items.Insert(0, tsNewItem);
tsNewItem.Click += new EventHandler(tsNewItem_Click);
}
}


Using the above coding we can find out the print button of the report viewers’ too strip. And the 1st item is for the print button. (I have found this out from its ToolTipText).


How ever you can add your own button if you like or you can use the existing print button. Both options are illustrated.


Add the following methods.


void tsNewItem_Click(object sender, EventArgs e) {
if (CustomPrintMethod != null) {
CustomPrintMethod.DynamicInvoke(null);
}
}

void tsItem_Click(object sender, EventArgs e) {
if (CustomPrintMethod != null) {
CustomPrintMethod.DynamicInvoke(null);
}
}


Here is the complete coding of the ‘CustomReportViewer’ class.


using System;
using System.Drawing;
using System.Text;
using System.Windows.Forms;
using CrystalDecisions.CrystalReports.Engine;
using CrystalDecisions.Shared;

namespace PrintDelegateMethod {
public partial class CustomReportViewer : Form {

public delegate void CustomPrintDelegate();

public Delegate CustomPrintMethod { get; set; }

public CustomReportViewer() {
InitializeComponent();

foreach (Control control in crystalReportViewer1.Controls) {
if (control is System.Windows.Forms.ToolStrip) {

//Default Print Button
ToolStripItem tsItem = ((ToolStrip)control).Items[1];
tsItem.Click += new EventHandler(tsItem_Click);

//Custom Button
ToolStripItem tsNewItem = ((ToolStrip)control).Items.Add("");
tsNewItem.ToolTipText = "Custom Print Button";
tsNewItem.Image = Resources.CustomButton;
tsNewItem.Tag = "99";
((ToolStrip)control).Items.Insert(0, tsNewItem);
tsNewItem.Click += new EventHandler(tsNewItem_Click);
}
}
}

void tsNewItem_Click(object sender, EventArgs e) {
if (CustomPrintMethod != null) {
CustomPrintMethod.DynamicInvoke(null);
}
}

void tsItem_Click(object sender, EventArgs e) {
if (CustomPrintMethod != null) {
CustomPrintMethod.DynamicInvoke(null);
}
}

private void CustomReportViewer_Load(object sender, EventArgs e) {
SampleReport report = new SampleReport();
crystalReportViewer1.ReportSource = report;
crystalReportViewer1.Refresh();
}
}
}


Add the following delegate to your calling class


public delegate void PrintDelegate();


Add the following method. This is the method that we want to invoke when the print button or the custom button is clicked.

private void CustomPrintMethod() {
MessageBox.Show("Custom Print Method");
}


And a button and the following click event code.


private void button1_Click(object sender, EventArgs e) {
CustomReportViewer viewer = new CustomReportViewer();
PrintDelegate mymethod = new PrintDelegate(CustomPrintMethod);
viewer.CustomPrintMethod = mymethod;
viewer.Show();

}


The complete source of the calling form:


using System;
using System.Drawing;
using System.Text;
using System.Windows.Forms;

namespace PrintDelegateMethod {
public partial class Form1 : Form {
public delegate void PrintDelegate();

public Form1() {
InitializeComponent();

}

private void CustomPrintMethod() {
MessageBox.Show("Custom Print Method");
}


private void button1_Click(object sender, EventArgs e) {
CustomReportViewer viewer = new CustomReportViewer();
PrintDelegate mymethod = new PrintDelegate(CustomPrintMethod);
viewer.CustomPrintMethod = mymethod;
viewer.Show();

}


}
}


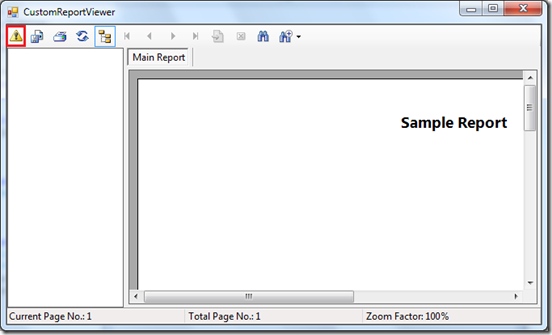
Now if you run the project, you can get a similar screen shown below. And please note that I have added a resource file named ‘Resources’ and added an image named ‘CustomButton’

img_scr_011_a

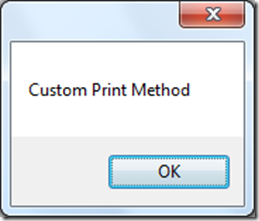
And if you click either of the buttons, your custom method will be invoked. The default print method will be executed only when the print button is clicked.
img_scr_012

Friday, 5 August 2011

How to insert data using SQL Views created using multiple tables

A view can be defined as a virtual table or a stored query and the data accessible through a view is not stored in the database as a distinct object. Only the select statement is stored on the database instead.
How ever views can be used and perform DML operations (Insert, Update & Delete) also.

Consider the following two tables.

CREATE TABLE STUDENT(
STD_ID INT,
STD_FNAME VARCHAR(20),
STD_LNAME VARCHAR(20)
)


CREATE TABLE STUDENT_PAYMENT(
STD_ID INT,
PAY_AMT MONEY,
PAY_DATE DATETIME
)


Now create the following views.


CREATE VIEW VW_STUDENT
AS
SELECT
STD_ID,
STD_FNAME,
STD_LNAME
FROM
STUDENT


CREATE VIEW VW_STUDENT_PAYMENT
AS
SELECT
STD_ID,
PAY_AMT,
PAY_DATE
FROM
STUDENT_PAYMENT


You can insert data to the above tables using the views we have just created. And it is the same syntax that we use to insert data to tables.


INSERT INTO VW_STUDENT
SELECT 1,'Peter','Parker' UNION
SELECT 2,'James', 'Watson'


INSERT INTO VW_STUDENT_PAYMENT
SELECT 1,1000,'01/01/2011' UNION
SELECT 1,1100,'01/02/2011' UNION
SELECT 1,1200,'01/03/2011' UNION
SELECT 1,1250,'01/04/2011' UNION
SELECT 1,1375,'01/05/2011' UNION
SELECT 2,750,'01/03/2011' UNION
SELECT 2,850,'01/04/2011' UNION
SELECT 2,950,'01/05/2011'

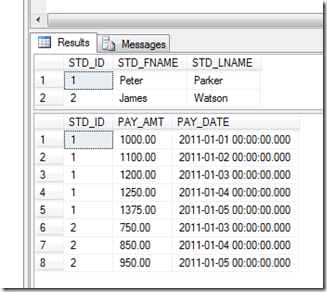
And if you query the tables you can see that the records have inserted correctly.

img_scr_009


Now we will create the following view. This time we will join two tables and create a somewhat complex query.


CREATE VIEW VW_LAST_PAYMENT_DETAILS AS
WITH CTE_STD (STD_ID,MAX_PAYDATE) AS (
SELECT SP.STD_ID, MAX(SP.PAY_DATE) AS MAX_PAYDATE
FROM STUDENT_PAYMENT AS SP
GROUP BY SP.STD_ID
)
SELECT S.STD_ID,S.STD_FNAME,S.STD_LNAME, P.PAY_AMT,P.PAY_DATE
FROM STUDENT AS S
JOIN STUDENT_PAYMENT AS P ON S.STD_ID = P.STD_ID
JOIN CTE_STD AS Q ON P.STD_ID = Q.STD_ID AND P.PAY_DATE = Q.MAX_PAYDATE
GROUP BY S.STD_ID,S.STD_FNAME,S.STD_LNAME, P.PAY_AMT,P.PAY_DATE


Using the above created view we can list the last payment details of each student.


img_scr_004


So if we required to insert last payment details using this view how shall we do it ? If you use the simple insert statements similar to the ones, we used earlier, you have could ended up with the following error.


INSERT INTO VW_LAST_PAYMENT_DETAILS (STD_ID,PAY_AMT,PAY_DATE)
SELECT 1,4440,GETDATE()


img_scr_007


In order to insert (update & delete) data to views created using multiple tables, you need to use an ‘Instead of trigger’.


**Please note that ‘After Triggers’ cannot be created for views.


Let’s create an instead of trigger using the following syntax.


CREATE TRIGGER TRGI_VW_PAYMENT ON VW_LAST_PAYMENT_DETAILS
INSTEAD OF INSERT
AS
BEGIN
INSERT INTO STUDENT_PAYMENT
SELECT STD_ID,PAY_AMT,PAY_DATE
FROM INSERTED
END


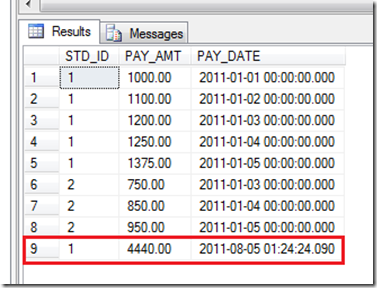
Now using the above insert syntax, you can insert data without getting any error. If you inspect the ‘STUDENT_PAYMENT’ table you can see that the data  has been inserted successfully.


img_scr_010

Sunday, 31 July 2011

Using MERGE statement in SQL Server 2008

‘MERGE’ statement is a new feature in SQL Server 2008. It can be used to perform insert, update and delete operation on a destination table simultaneously based on the results of a join with a source table. Well, it sounds like a bit confusing, but let's see an example on how it can help us.

Assume we have following two tables.

  • STUDENT_A
  • STUDENT_B

Both table are identical in structure (Structure does not need to be identical).

STUDENT_A

img_scr_001


STUDENT_B

img_scr_002


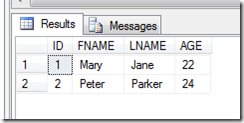
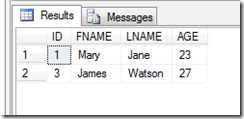
And we have to update the ‘STUDENT_A’ with the details at ‘STUDENT_B’. We need to compare and if student ID’s are matched, ‘A’ table should be updated with the ‘B’ table. And if the ID’s in ‘B’ Table are new then we have to insert those to the ‘A’ table.

img_scr_003


So using the ‘MERGE’ statement we can achieve this in one execution.

Syntax:

MERGE  <Target> [AS T]
USING <Source> [AS S]
ON <Condition>
[WHEN MATCHED THEN <Execution>]
[WHEN NOT MATCHED BY TARGET <Execution>]
[WHEN NOT MATCHED BY SOURCE <Execution>]


And to do the above operation use the following code:


MERGE STUDENT_A AS T
USING STUDENT_B AS S
ON T.ID = S.ID
WHEN MATCHED THEN UPDATE SET T.AGE = S.AGE
WHEN NOT MATCHED THEN INSERT (ID, FNAME, LNAME, AGE) VALUES(S.ID,S.FNAME,S.LNAME,S.AGE);


**Please note that semicolon ‘;’ is mandatory.


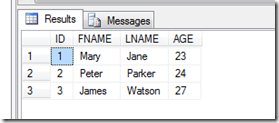
So after executing the above code, and if you inspect the Table ‘A’, you can see that it’s updated the way we wanted.


img_scr_005


And also you can use additional rules other than your condition. To illustrate that, first we insert a record to both the tables.


insert into STUDENT_A 
select 10, 'John','Doe',30

insert into STUDENT_B
select 10, 'John','Doe',30


And using the following code you can remove the record with matches the condition and have the value 10.


MERGE STUDENT_A AS T
USING STUDENT_B AS S
ON T.ID = S.ID
WHEN MATCHED and S.ID < 5 THEN UPDATE SET T.AGE = S.AGE
WHEN MATCHED and S.ID = 10 THEN DELETE
WHEN NOT MATCHED BY TARGET THEN INSERT (ID, FNAME, LNAME, AGE) VALUES(S.ID,S.FNAME,S.LNAME,S.AGE);


And if you inspect the table A, you can see that it has the same following results:


img_scr_005