Thursday 19 November 2015

Capturing and Analyzing deadlocks in SQL Server

No matter how perfect your code and how optimized the way you have written is, facing a situation of getting a deadlock is inevitable. And it would make the situation even more complex when you know that a deadlock had occurred but you have no clue which the victim and perpetrator was.

There are few ways to capture and analyze a deadlock. I will explain two ways in this post.

  1. Enabling trace flags to capture/log deadlock information into SQL Log
  2. Use SQL Profiler to capture a deadlock.


Enabling trace flags to capture/log deadlock information into SQL Log

This method will make sure that the deadlock details are logged in the SQL log file (not the transaction log). Even though the details which are captured via this method is textual  it gives you the option of inspecting the details at a later time.

First you need to enable the trace flags using the following syntax:

DBCC TRACEON (1222, 1204, -1)


Afterwards we will simulate a deadlock : (in reality you don’t need to do this if you are facing such issue)

First create two sample tables and insert few records which we will use to produce a deadlock.


-- Create a Sample Tables --

CREATE TABLE SampleDeadLock_1(
Item_Code INT
,Item_Desc VARCHAR(100)
,Qty INT
)

CREATE TABLE SampleDeadLock_2(
Item_Code INT
,Item_Desc VARCHAR(100)
,Qty INT
)

-- Insert couple of records to each table --

INSERT INTO dbo.SampleDeadLock_1(
Item_Code
,Item_Desc
,Qty
)
VALUES
(1,'CPU', 10)
,(2, '20 GB - Hard Disk', 20)

INSERT INTO dbo.SampleDeadLock_2(
Item_Code
,Item_Desc
,Qty
)
VALUES
(3,'Monitor', 15)
,(4, 'Keyboard & MOuse', 25)


Now open two query windows in SQL Server Management Studio (Window 1 & Window 2) and paste the following code to ‘Window 1’


BEGIN TRAN

UPDATE dbo.SampleDeadLock_1 SET Qty = 100 WHERE Item_Code = 1

WAITFOR DELAY '00:00:30'

UPDATE dbo.SampleDeadLock_2 SET Qty = 200 WHERE Item_Code = 3


And paste the following code to ‘Window 2’


BEGIN TRAN

WAITFOR DELAY '00:00:10'

UPDATE dbo.SampleDeadLock_2 SET Qty = 300 WHERE Item_Code = 3
UPDATE dbo.SampleDeadLock_1 SET Qty = 400 WHERE Item_Code = 1


Afterwards execute the code in Window 1 and immediately execute the code in Window 2. After few seconds (30+) you will see a deadlock error message in Window 1.


image


And when you checked on the ERRORLOG file, you will be able to find out the relevant details which relates to the deadlock. (I have highlighted the deadlock victim details in Red and the perpetrator details in blue)


image


Using SQL Profiler to capture a deadlock (Deadlock Graph)


One of the issues we have in the aforementioned method is that we need to look into lots of textual information in order to extract the details which is relevant for the deadlock. In this example it’s somewhat easier since we had chosen a simple situation. But things could get real hard during an actual situation where the processes are bit complex.


In such case (any case), we can use the SQL Profiler to detect the deadlock in a more user friendly manner.


** Please Note: Down-side of this method is you need to have the profiler running during the time that the deadlock had occurred. And this isn’t the best way if you need to troubleshoot in a Production Environment.


How ever for the sake of understanding we will see how we can achieve this.


Open the SQL Profiler and connect to the relevant SQL Server. And in the ‘Trace Properties’ window choose ‘TSQL_Locks’ as the template.


image


And in the ‘Event Selection’ tab, please choose the following options.


  • Deadlock graph
  • Lock:Deadlock
  • Lock:Deadlock Chain

image


Before click on running the profiler, Rollback the transaction which is running from the first example (The one which didn’t become the Deadlock Victim)


Start the profiler by clicking the ‘Run’ button. And once the profiler is running, execute the code on Query Window 1 and afterwards execute the code in Query Window 2.


Once the deadlock occurs the Profiler will display the relevant information in a graphical manner. This will contain all the relevant details which is required in order to troubleshoot the deadlock. And if you hover the cursor over the processes in the graph (shown in ellipses) a tooltip will be displayed along with the statement which has been executed, which caused the deadlock to occur.


image


I hope this will help you in order to troubleshoot a deadlock situation.

Monday 26 October 2015

Elevate permission on a SQL login having read only access to Execute Stored Procedures and to View Database Schemas

Due to an unavoidable situation, it was decided that all the write access to a particular server (SQL Server) was required to be removed immediately. And only few people should be able to access the server with full privileges. How ever this wasn’t sound very friendly to the developers, since they were using this server for various kinds of activities during their development and testing. Once the write access was removed we ran into various kinds of trouble since majority couldn’t view the contents of the database objects such as Stored Procedures, Views etc.

So a requirement came to allow them to access the schemas so that they can view the contents, also to execute the procedures (required when debugging a flow using Profiler) without allowing anyone to change or add any new database objects nor any data updates to existing tables directly.

The easiest workaround was to create a SQL user login with read permission and grant execution access to that login.

1.  Create a SQL Login.

image


2. Only keep the ‘public’ server role selected for this SQL Login.

image


2. Select ‘db_datareader’ role membership.

image


Afterwards if you connect to the SQL Server using the above created login, you can see that only read only operations are allowed. You will be able to see the tables, views (cannot see the underlying SQL Code). Stored procedures will be hidden


image


image

I have created the following stored procedure in my sample database (AdventureWorks) for testing purpose.

CREATE PROCEDURE ReadOnlyUserProc
AS 
BEGIN
    SELECT GETDATE() AS CurrentDate
END


And when the aforementioned procedure is executed as the ‘readonlyuser’ we will get the following error:


EXEC ReadOnlyUserProc

image


Now lets just provide the necessary access to this login so that it can be use to execute the procedures and to see the schemas of database objects. Use the following code to grant the execution access to the previously created user.


USE AdventureWorks
GO
 
GRANT EXECUTE TO readonlyuser
GO


And now when we execute the stored procedure we will get the desired result.


EXEC ReadOnlyUserProc

image


However still we are unable to see the schema of the SQL Objects, which is a part of what we want in this exercise.


image


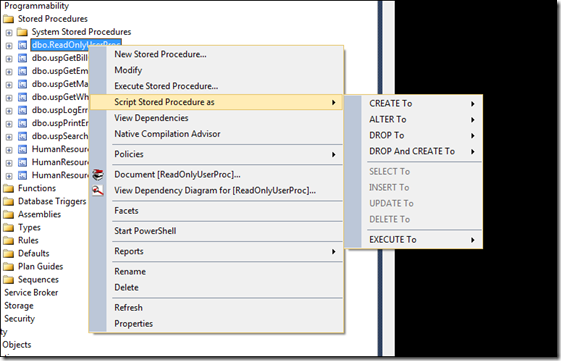
If you try to generate the script by right clicking the object you will get an error message:


image


We will try to fix that issue as well. Please follow these steps:


1. Right click the login and go to the properties window.


2. Go to the ‘Securables’ tab and check/tick the ‘Grant’ check box for ‘View any definition’.


3. Click ‘OK’


image


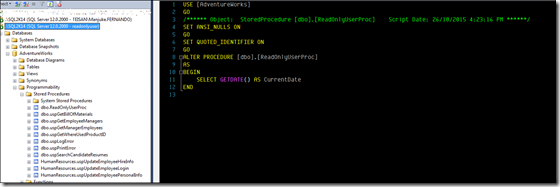
Now you can see the definitions of the database objects.


image


image


image


Hope this might be useful to you as well.

Saturday 17 October 2015

Elevate permission on a SQL login having read access to run the SQL Profiler

Sometime it’s necessary to allow SQL logins only to have read access to the respective SQL Servers. But it becomes a necessity to allow the developers to run the SQL Profiler when it comes to troubleshoot or to debug a flow and to find the exact point where the problem is generating. How ever it’s a very common opinion that a login having a read only access cannot run the profiler unless it’s included into the ‘sysadmin’ SQL role.
Well this isn’t entirely true. We could allow a SQL login to start and monitor SQL activity using the SQL Profiler and yet keeping the read only access to the SQL schemas. Follow these steps to achieve this:
1. Connect to the SQL Server and expand the Security->Logins node

image

2. Right click the desired login and go to ‘Properties’ from the context menu

image

3. Go to the ‘Securables’ tab and check/tick the Grant checkbox on ‘Alter Trace’. And click ok to save the details.

image

Now you can run the profiler and monitor details using that SQL Login.

image

image

Wednesday 3 June 2015

Error occurs when CTE Alias is ‘RESULT’ - Incorrect syntax near 'RESULT'

Few days back one of my colleague ran into a very strange issue when he was asked to do an alteration to an existing procedure. The procedure was having a SELECT statement which included few Common Table Expressions. It has been running without an issue, until we tried to save the alteration. The alteration was a pretty simple one which was just to add couple of more columns. The query was similar to the one shown below

;WITH RESULT AS(
    /* Your logic  */
    SELECT GETDATE() AS DTE
)
SELECT * FROM RESULT


How ever when we tried to save the changes, it was throwing the following error.


Msg 102, Level 15, State 1, Line 2
Incorrect syntax near 'RESULT'.

But when we go through the query we couldn’t find any issues, and it seems the syntax was quite accurate. So we tried a different server and was able to save the changes without any error. The only difference was one server was running SQL Server 2012 which is having a higher build

Works fine on the following build


Microsoft SQL Server 2012 - 11.0.5058.0 (X64)
    May 14 2014 18:34:29
    Copyright (c) Microsoft Corporation
    Developer Edition (64-bit) on Windows NT 6.1 <X64> (Build 7601: Service Pack 1) (Hypervisor)


Throws an error on the following build


Microsoft SQL Server 2012 - 11.0.2100.60 (X64)
    Feb 10 2012 19:39:15
    Copyright (c) Microsoft Corporation
    Developer Edition (64-bit) on Windows NT 6.1 <X64> (Build 7601: Service Pack 1) (Hypervisor)


And when googled we could find that ‘RESULT’ is a future reserved keyword:


https://msdn.microsoft.com/en-us/library/ms189822.aspx


image


But we were still left out with a question of why it failed on an earlier build but succeeded on a most recent build. Please feel free to comment on this if you have further information.

Wednesday 20 May 2015

Conflict in log4net on GAC when a Crystal Report is viewed through .Net Code

We faced an issue sometime ago, which put us into a very tight situation. The issue was when a Crystal Report file is loaded through .Net code it threw the following error. This is the first of a series of error which lead to another and so forth.
System.Reflection.TargetInvocationException: Exception has been thrown by the target of an invocation.
---> System.TypeInitializationException: The type initializer for 'CrystalDecisions.ReportSource.ReportSourceFactory' threw an exception.
---> System.TypeInitializationException: The type initializer for 'CrystalDecisions.Shared.SharedUtils' threw an exception.
---> System.IO.FileLoadException: Could not load file or assembly 'log4net, Version=1.2.10.0, Culture=neutral,
PublicKeyToken=692fbea5521e1304' or one of its dependencies. The located assembly's manifest definition does not match the assembly reference.
(Exception from HRESULT: 0x80131040)
File name: 'log4net, Version=1.2.10.0, Culture=neutral, PublicKeyToken=692fbea5521e1304'
   at CrystalDecisions.Shared.SharedUtils..cctor()


And the confusion grew even further when we checked the GAC (Global Assembly Cache). Because we could see that in GAC, the mentioned assembly (log4net) is being registered with the version 1.2.10.0 and with the correct ‘PublicKeyToken’ (692fbea5521e1304).

image

And we didn’t really worry about the ‘Processor Architecture’ column, since our development environment is 64-bit and all the Crystal Reports development pre-requisites were there in the development environment and Crystal Runtime was already installed (version 13 – 64-bit). And in our application code we were using the same log4net and it was already presented in the bin folder.

Then when we googled the issue we could be able to come across with similar incidents, where the majority of the people were able to resolve the issue by installing the Crystal Runtime. But it was sort of a puzzle to us since we already had it installed it. But later we tried by un-installing the runtime and re-installing it again, assuming some corruption might had occur during the previous installation or afterwards. But the result was same.

Then we came across with the following article which gave us some kind of a hint of the issue we are facing:

http://scn.sap.com/message/9848374#9848374

And it occurred to us that even though we had the same assembly which the error is pointing installed in GAC, still the Crystal assemblies were expecting some other log4net assembly to be presented in GAC.

Therefore we installed the Crystal Runtime version 13 for 32-bit. Afterwards the GAC was having both the assemblies registered.

image

And this resolved the issue. And we came to a conclusion that even our development environment is 64-Bit, we need to have the log4net assembly for 32-bit since crystal is referring to that internally.

Hope this would help you if you are facing the same problem.

Monday 5 November 2012

Create a Cursor using Dynamic SQL Query

Even though we are advised not to use or to minimize the usage of cursors in SQL, there are times which, it’s the only available option, depending on the task and the situation. But there are times you are required to build the cursor using a dynamic SQL select statement.
To illustrate this, i will create two tables and populated it with sample data.

 
--==== Create sample tables ====--
create table sample_table_a(
    id        int
    ,name    varchar(50)
)
 
create table sample_table_b(
    id            int
    ,country    varchar(50)
)
 
--==== Populate with sample data ====--
insert into sample_table_a (id,name)
values(1,'Windows'),(2,'Mac OS'),(3,'Linux')
 
insert into sample_table_B(id,country)
values(1,'Austria'),(2,'Australia'),(3,'USA'),(4,'Singapore')


When creating a cursor using dynamic query, initially the cursor should be declared and passed on to the dynamic query execution.


/* ==== Variable Declaration ==== */
declare @objcursor as cursor 
 
declare 
    @vsql        as nvarchar(max)
    ,@vquery    as nvarchar(max)
    ,@id        as int
    ,@value        as varchar(50)
    
 
/* ==== Sample Table A ==== */
set @vquery = 'select id, name from sample_table_a'
set @vsql = 'set @cursor = cursor forward_only static for ' + @vquery + ' open @cursor;'
 
exec sys.sp_executesql
    @vsql
    ,N'@cursor cursor output'
    ,@objcursor output
 
fetch next from @objcursor into @id,@value
while (@@fetch_status = 0)
begin
    print cast(@id as varchar) + ' - ' + @value
    fetch next from @objcursor into @id,@value
end
 
close @objcursor
deallocate @objcursor
 
/* ==== Sample Table B ==== */
 
set @vquery = 'select id, country from sample_table_b'
set @vsql = 'set @cursor = cursor forward_only static for ' + @vquery + ' open @cursor;'
 
exec sys.sp_executesql
    @vsql
    ,N'@cursor cursor output'
    ,@objcursor output
 
fetch next from @objcursor into @id,@value
while (@@fetch_status = 0)
begin
    print cast(@id as varchar) + ' - ' + @value
    fetch next from @objcursor into @id,@value
end
 
close @objcursor
deallocate @objcursor


Also you can create a procedure which will return you a cursor taking the selection query as a parameter.


CREATE PROCEDURE [dbo].[Gsp_Create_GenericCursor]
    /* Parameters */
    @vQuery        NVARCHAR(MAX)
    ,@Cursor    CURSOR VARYING OUTPUT
AS
BEGIN
    SET NOCOUNT ON
    
    DECLARE 
        @vSQL        AS NVARCHAR(MAX)
    
    SET @vSQL = 'SET @Cursor = CURSOR FORWARD_ONLY STATIC FOR ' + @vQuery + ' OPEN @Cursor;'
    
   
    EXEC sp_executesql
         @vSQL
         ,N'@Cursor cursor output'  
         ,@Cursor OUTPUT;
END


Use the following syntax to use the above mentioned procedure


DECLARE @obj AS CURSOR
DECLARE @i AS INT    
 
 
    EXEC dbo.Gsp_Create_GenericCursor 
        @vQuery = N'SELECT 1 AS FLD1 UNION SELECT 2 UNION SELECT 3 UNION SELECT 4'
        ,@Cursor = @obj OUTPUT
        
        FETCH NEXT FROM @obj INTO @i
        
        WHILE (@@FETCH_STATUS = 0)
        BEGIN
            PRINT @i
            
            FETCH NEXT FROM @obj INTO @i
        END
        
        CLOSE @obj
        DEALLOCATE @obj

Wednesday 19 September 2012

Introduction to SSDT (SQL Server Data Tools)

What is SSDT ?

SQL Server Data Tools (SSDT) is a toolset which provides an integrated environment for database developers to carry out all their database design work for any SQL Server platform (both on and off premise) within Visual Studio. Database developers can use the SQL Server Object Explorer in VS to easily create or edit database objects and data, or execute queries.

In a previous blog entry I have described on how to install SSDT into the VS environment. During this I will briefly describe few of it’s features.

SSDT’s intention is not to replace the SQL Server Management Studio, but provide a developer a complete development environment, which the developer need not required to leave Visual Studio IDE to do any database related development. The tool does not contain all the features which you find in SSMS, yet it’ll provide sufficient functionality which will required to most of the developers during their development tasks.

I find following features, pretty  much interesting and helps to increase the productivity of the developer/team.


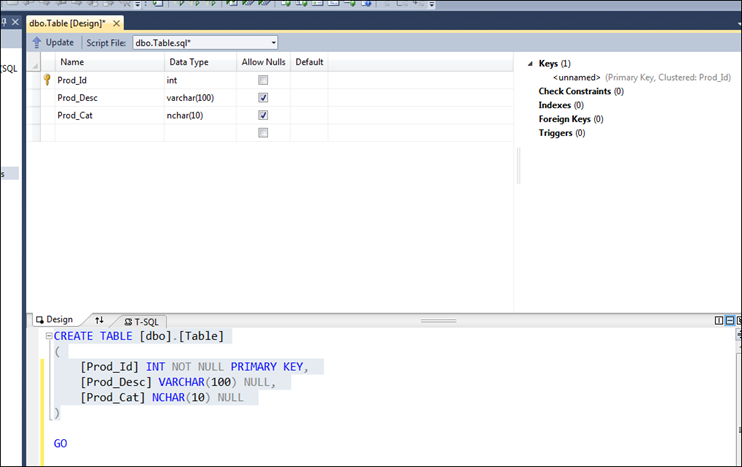
1. Design & Code view in a single screen.

img_screen_001

Ability to see the design view and the code view in a single screen is a wonderful thing. You do not have to move across screens. And the changes you do to the design view will be affected to the code immediately and vice versa.


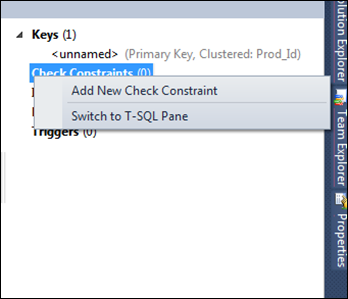
2. Ability to add Constraints, Indexes, Foreign Keys & Triggers without changing the screen

Adding constraints, indexes, etc.. are much easier. You can add those by right clicking and choosing the ‘add <object>’ menu like shown below.

img_screen_02


3. It uses ‘Declarative – Model Based Development’

What this means is that there is always an in-memory representation of what a database looks like—an SSDT database model— and all the SSDT tools (designers, validations, IntelliSense, schema compare, and so on) operate on that model. This model can be populated by a live connected database (on-premise or SQL Azure), an offline database project under source control, or a point-in-time snapshot taken of an offline database project (you will work with snapshots in the upcoming exercises). But to reiterate, the tools are agnostic to the model’s backing; they work exclusively against the model itself. Thus, you enjoy a rich, consistent experience in any scenario—regardless of whether you’re working with on-premise or cloud databases, offline projects, or versioned snapshots.


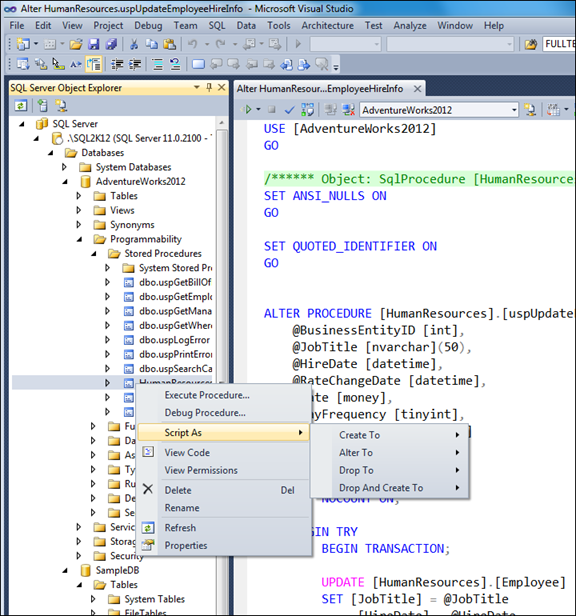
4. Connected Development

Although SSDT places great emphasis on the declarative model, it in no way prevents you from working imperatively against live databases when you want or need to. You can open query windows to compose and execute T-SQL statements directly against a connected database, with the assistance of a debugger if desired, just as you can in SSMS.

img_screen_03


5. Disconnected Development

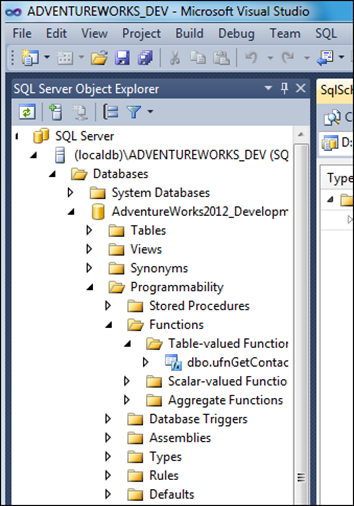
The new SQL Server Object Explorer lets you connect to and interact with any database right from inside Visual Studio. But SSDT offers a great deal more than a mere replacement for the connected SSMS experience. It also delivers a rich offline experience with the new SQL Server Database Project type and local database runtime (LocalDB).

Actually this is one great feature it has. Because due to many reasons, most of the time we are requested to work offline, or to do our development locally and later on merged. So this feature allows us to maintain a local database and do all the development using that. And later on merged/published to other database. And by doing a schema comparison, it’s possible to find out the changes we have done.

img_screen_04


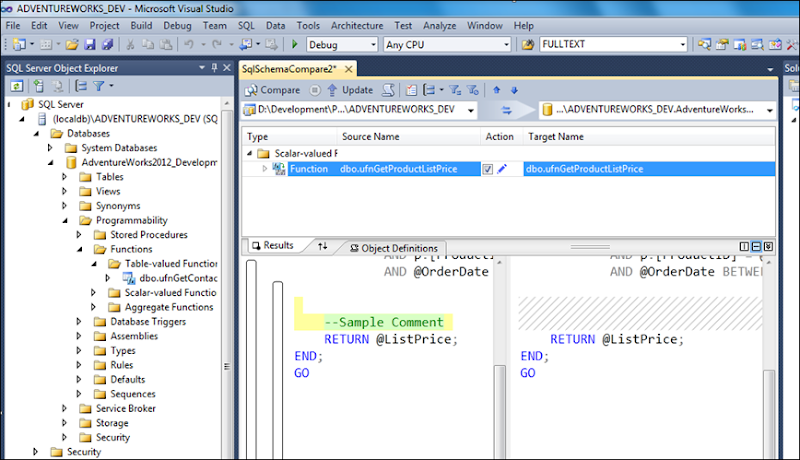
6. Schema Comparison

This is a very valuable feature. This allows us to do a schema comparison between our development environment and the physical database (or vice versa) and find out the changes very quickly.

img_screen_05


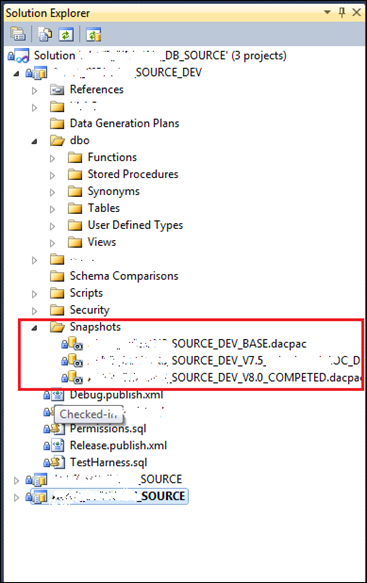
7. Saving snapshots of the Database

Sometimes it’s required to keep snapshots of your database at different stages of the development. And the best thing is, it even allows you to compare between two database snapshots. So it’s easy to see the changes you have done compared to the previous stages.

img_screen_06

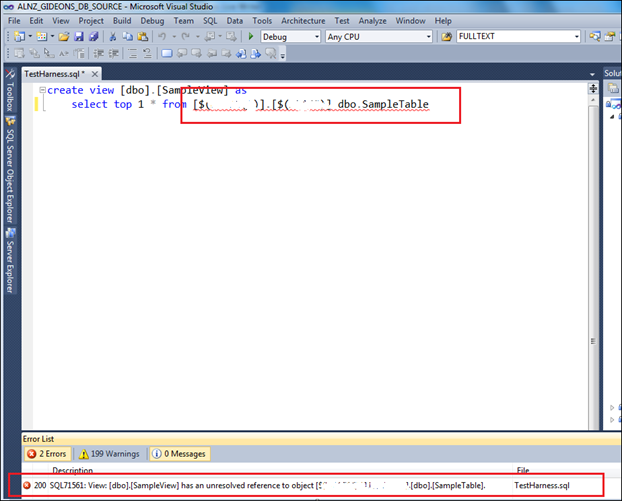
8. Ability to find any errors or reference issues in design time

When SSDT is used it’s easy to identify any syntax issue or any reference issue before deploying it to the database. E.g. assume we have one view which is referring to few columns of a table. Usually if someone change or remove any columns from the table which this view is referring, there is no way of identify that, till the view is used in our application. But when SSDT is used, it will show you these issues, when building the project. So these can be eliminated before we apply these to the deployment server.
img_screen_07

These are some features which I have find very interesting and most developers expect. But having said that I am not saying it’s the complete set of features. There are few missing functionalities which I felt that it would have been even nicer, if those were there.

And you can find a good article in here (http://www.codeproject.com/Articles/357905/Evaluating-SQL-Server-Data-Tools) regarding the SSDT. You can find things in more depth.